Ubuntu
debsums
debsums is a useful utility to validate packages in a ubuntu or debian system.
Usage:
sudo debsums -c
If this identifies any problems you can fix them using.:
sudo apt install --reinstall <package name>
If debsums idenfifies several packages with issues, to fix all of them use:
sudo apt install --reinstall $(dpkg -S $(debsums -c) | cut -d : -f 1 | sort -u)
For more information there is a useful post about debsums on askubuntu
Key is stored in legacy trusted.gpg keyring
For more information, see Update your apt keys for Ubuntu and other Debian based operation
e.g:
W: https://artifacts.elastic.co/packages/8.x/apt/dists/stable/InRelease:
Key is stored in legacy trusted.gpg keyring (/etc/apt/trusted.gpg),
see the DEPRECATION section in apt-key(8) for details.
For conversation, see Chat with Malcolm ref trusted.gpg.
Here’s how to switch:
sudo apt-key list
This will display lots of entries like:
/etc/apt/trusted.gpg
--------------------
pub   rsa2048 2013-09-16 [SC]
      4609 5ACC 8548 582C 1A26  99A9 D27D 666C D88E 42B4
uid           [ unknown] Elasticsearch (Elasticsearch Signing Key) <[email protected]>
sub   rsa2048 2013-09-16 [E]
Find the key for Elasticsearch and note the last 8 characters
(ignore the spaces) i.e. D88E42B4.
Delete that key:
sudo apt-key del D88E42B4
Make sure the keyrings directory exists using ls:
ls -l /etc/apt/keyrings
Tip
On 22.04 it is created by the install / upgrade.
If using an earlier version, sudo mkdir -p /etc/apt/keyrings.
if you already have an elastic search source list file in the
/etc/apt/sources.list.d/ directory - delete it.
Install the elastic search key:
wget -qO - https://artifacts.elastic.co/GPG-KEY-elasticsearch | sudo gpg --dearmor -o /etc/apt/keyrings/elasticsearch-keyring.gpg
Update the apt sources:
echo "deb [signed-by=/etc/apt/keyrings/elasticsearch-keyring.gpg arch=amd64] https://artifacts.elastic.co/packages/8.x/apt stable main" | sudo tee /etc/apt/sources.list.d/elasticsearch.list
Salt and keyrings
Malcolm pushed a commit to Salt to install the repo key correctly for Elasticsearch for both 20.04 and 22.04: https://gitlab.com/kb/salt/-/commit/25072c1ebee0331886e107f07cbb19982c4fdb23
Warning
It will remove the warning but it does not delete the key from
/etc/apt/trusted.gpg so you need to run
sudo apt-key del D88E42B4 on the server to delete it.
Tested on 22.04 and 20.04, but not sure how far back the signed-by option
goes. It may not work for older than 20.04
For Salt documentation, see Salt - apt-key deprecated…
Upgrade to 20.04
do-release-upgrade
Tip
If 20.04.1 is still not released when you run this command, then you
can upgrade using do-release-upgrade -d.
Tip
Just so you remember, an additional SSH daemon will be started at port ‘1022’.
Select the recommended option for the LXD snap track i.e. version
4.0
This message was displayed at the end of the upgrade:
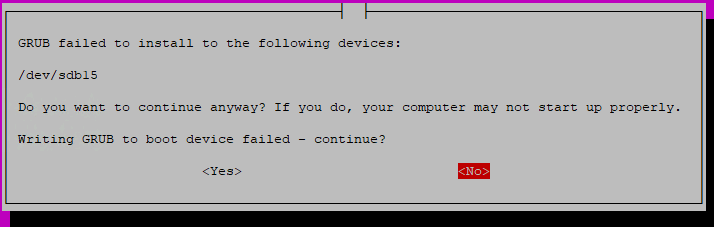
I clicked Yes to continue, and all was well.
Salt
Uninstall Salt (Master and Minion)…
Update:
# /etc/apt/sources.list.d/saltstack.list:
deb http://repo.saltstack.com/py3/ubuntu/20.04/amd64/latest focal main
Re-install Salt
Postgres Upgrade Cluster
To move the data from Postgres 10 to 12, run the following as root:
# list the clusters
pg_lsclusters

# drop the new (empty) cluster
pg_dropcluster 12 main --stop
# migrate the data from 10 to 12
pg_upgradecluster 10 main

# remove the 10 cluster
pg_dropcluster 10 main --stop

# remove the old database engine
apt remove postgresql-10

# list the clusters
pg_lsclusters
Ver Cluster Port Status Owner    Data directory              Log file
10  main    5432 online postgres /var/lib/postgresql/10/main /var/log/postgresql/postgresql-10-main.log
For more information, see Postgres Upgrade Cluster …
LetsEncrypt
For Ubuntu 20.04, we are using the certbot package:
rm -rf /opt/letsencrypt
For more information, see the diff:
Use ‘certbot’ package (rather than letsencrypt git repo)